Cloud - MultiCloud Application Migration
Introduction
Before started, I would like to appriciate the amazing MultiCloud & DevOps Bootcamp by Jean Rodrigues
This blog is the overview of the multiCloud migration project. The project is aimed to migrate an web application to cloud platforms. Since there is a pertential need for using different cloud platform for a single project, this project will deploy the application across AWS and GCP.
The codes are available in Github
Architecture
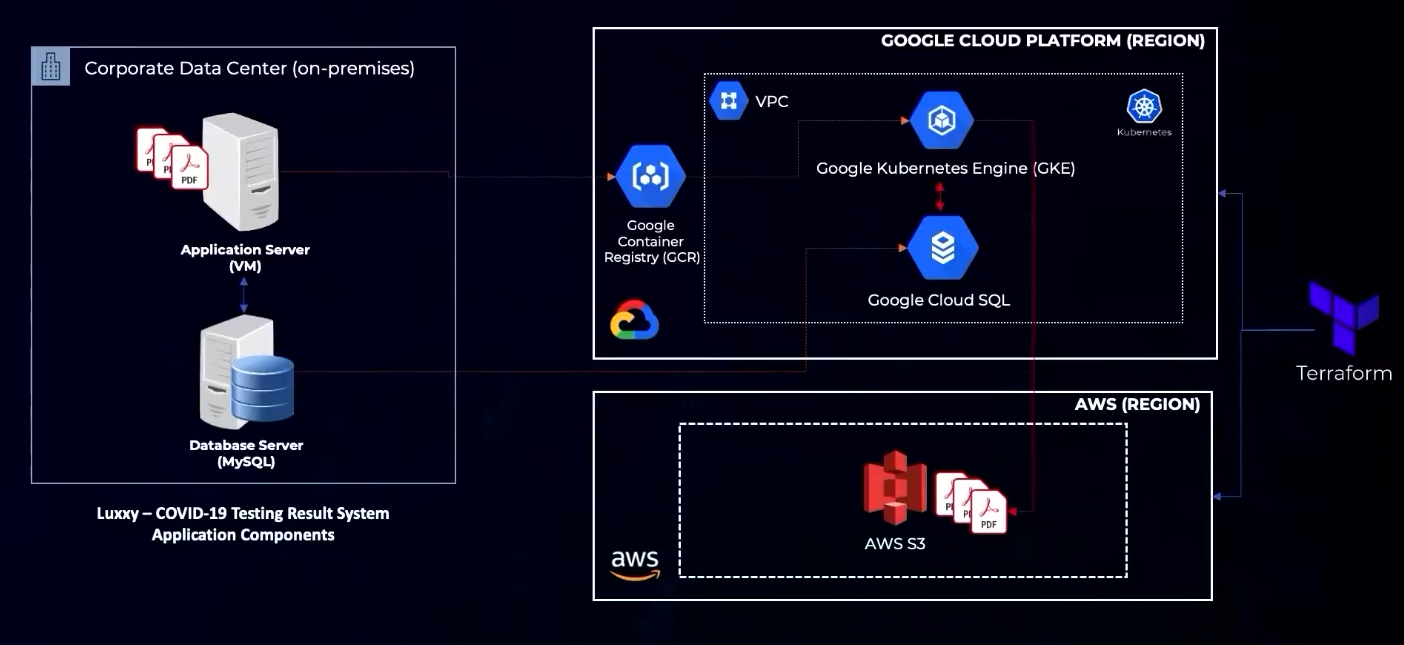
We will migrate the application runs on the Corporate Data Center(left) to the intergration of GCP and AWS platform(right).
About the Application
This application is a website designed to upload the COVID-19 testing result to the corporation’s database. The website runs on the application server and the database runs on the database server.
Cloud architecture Overview
Amazon Web Service: In our plan, we only use the data storage (S3) and authentification(IAM role) services. All the pdf file for the COVID-19 testing result will be saved on a Amazon S3 bucket.
- AWS S3: Amazon Simple Storage Service (Amazon S3) is an object storage service offering industry-leading scalability, data availability, security, and performance. We will store all the PDF files of the testing result here in this project.
Google Cloud Platform: The Google Cloud Platform will handle the deployment of the website.
-
Google Container Registory (GCR): Google Container Registry (GCR) is a part of Google Cloud Platform’s suite of services designed to host and manage Docker container images. In this project, we will create a Docker image for the application and save it here.
-
VPC: A Virtual Private Cloud (VPC) in Amazon Web Services (AWS) is a service that allows you to launch AWS resources into a virtual network that you’ve defined. A VPC is a fundamental component of AWS cloud computing, providing the networking layer for Amazon EC2 instances and other AWS resources. In this project, we will run the Docker container of the application on Kubernetes Engine which is running on this VPC.
-
Kubernetes: Kubernetes, often abbreviated as K8s, is an open-source platform designed to automate deploying, scaling, and operating application containers. In this project, we will use Kubernetes to run the Docker container of the application.
-
Google Kubernetes Engine (GKE): Google Kubernetes Engine (GKE) is a managed, production-ready environment for deploying containerized applications. It is one of the services offered by Google Cloud Platform (GCP) that simplifies the management and deployment of applications using Kubernetes.
-
Google Cloud SQL: Google Cloud SQL is a fully-managed database service that allows you to set up, maintain, manage, and administer your relational databases on Google Cloud Platform. It supports databases using MySQL, PostgreSQL, and SQL Server.
Terraform: Terraform is designed for speeding up the deployment of Cloud projects. It will automate the process of creating instances of different resources for different cloud platform and creating a pipline for deployment the application like a factory method.
Deployment
Create Cloud project and resources with Terraform
-
Access Key for AWS: A access key for AWS should be provided to Terraform for the automation deployment. We can get the authentification key by creating a
rolein AWSIAMand add aAmazonS3FullAccesspermissions policies to the role. Download the key and save askey.csv. Then upload the key file to GCP. -
GCP preparation: Since the application will host on GCP, all the services should be deployed on GCP. Clone the Github repo to GCP via Google cloud shell
git clone https://github.com/yu-jinh/MultiCloud-Migration.git\upload the key to the project folder and change the shell scripts permissions
  mv key.csv MultiCloud-Migration/
  cd MultiCloud-Migration
  chmod +x *.sh
Execute the commands below to prepare the AWS and GCP environment:
  mkdir -p ~/.aws/
  touch ~/.aws/credentials_multiclouddeploy
  ./aws_set_credentials.sh key.csv
  GOOGLE_CLOUD_PROJECT_ID=$(gcloud config get-value project)
  gcloud config set project $GOOGLE_CLOUD_PROJECT_ID
Set the project in the Google Cloud Shell:
./gcp_set_project.shEnable the Kubernetes, ContainerRegistry and cloud SQL APIs:
gcloud services enable containerregistry.googleapis.com gcloud services enable container.googleapis.com gcloud services enable sqladmin.googleapis.com gcloud services enable cloudresourcemanager.googleapis.com gcloud services enable serviceusage.googleapis.com gcloud services enable compute.googleapis.com gcloud services enable servicenetworking.googleapis.com --project=$GOOGLE_CLOUD_PROJECT_ID -
Running Terraform to provision MultiCloud infrastructure in AWS and Google Cloud
  cd ~/MultiCloud-Migration/terraform/
  terraform init
  terraform plan
  terraform apply
Now, Terraform has prepared all the resources for us to the migration project. Next, we will use the initialized resources to run the application.
Set up SQL server, and run Docker image on Kubernetes.
Generate a new access key for full s3 access named luxxy-covid-testing-system-en-app1.csv
-
Cloud SQL: We have registered a Google Cloud SQL service with terreform. Now we will try to connect it via Google Cloud Shell.
First, check the SQL public IP address on the GCP, replace with the host parameter on the following command:
mysql --host=<replace_with_public_ip_cloudsql> --port=3306 -u app -pThen, use
create_table.sqlfile to create a table nameddbcovidtestinguse dbcovidtesting; source ~/MultiCloud-Migration/db/create_table.sql show tables; exit;Now, we successfully connect to the SQL service on GCP.
- Docker image container: To run the application, a good practice is to create a Docker image and run it inside a container.
Enable Cloud Build API via Cloud Shell.
gcloud services enable cloudbuild.googleapis.comBuild the Docker image and push it to Google Container Registry.
GOOGLE_CLOUD_PROJECT_ID=$(gcloud config get-value project) cd ~/MultiCloud-Migration/app gcloud builds submit --tag gcr.io/$GOOGLE_CLOUD_PROJECT_ID/luxxy-covid-testing-system-app-en -
Kubernetes deployment: Kubernetes can automatically adjust the number of container instances based on the demand, ensuring that applications have the resources they need without over-provisioning or under-provisioning. Therefore, it is a good choice to run our application on Kubernetes.
Open the
yamlfile to config the S3 access key, bucket name, and DB host name.cd ~/MultiCloud-Migration/kubernetes vim luxxy-covid-testing-system.yamlNext, connect to the GKE (Google Kubernetes Engine) cluster via Console. We need to goto the Kubernetes Engine, CONNECT and copy the connect command.
Then Deploy the application Luxxy in the Cluster.
kubectl apply -f luxxy-covid-testing-system.yamlUnder GKE > Workloads > Exposing Services, get the application Public IP and visit the deployed application website. Now we can upload the pdf texting result to the website, which will be saved to the S3 bucket.
Move the existing pdf data to S3
The last step for this migration is the data migration. We need to move the existing pdf files to teh Amazon S3 bucket which is connected to the application running on Kubernetes.
mysql --host=<replace_with_public_ip_cloudsql> --port=3306 -u app -p
Then, use db_dump.sql file to create a table named dbcovidtesting
use dbcovidtesting;
source ~/MultiCloud-Migration/db/db_dump.sql
show tables;
exit;
The table should have the informations of the tested people and the pdf file name. Check if the data got imported correctly.
select * from records;
exit;
Next, open the AWS Cloud Shell, download the project.
git clone https://github.com/yu-jinh/MultiCloud-Migration.git\
put the files to S3 bucket.
cd /MultiCloud-Migration/pdf_files
aws s3 sync . s3://luxxy-covid-testing-system-pdf-en-xxxx
Now, we can see all the pdf files form the website. The migration is completed!